|
|
|
| Reference Series |
Table of Contents For This Issue
|
|
| |
| How Computers Work, Part I | |
|
August 2001• Vol.5 Issue 3 Page(s) 100-103 in print issue | |
FAT Maps Hard Drive Storage Your PC’s Complex Filing System |
 Today’s operating systems make file storage and retrieval virtually transparent to the user, but the steps Windows must take to find the information you request are extremely complicated. When a link to a file or program is clicked, Windows must quickly find
the associated data in a sea of other files, load it, and then find some place to stow the file when it is edited. None of this would be possible without an advanced organizational structure, and that’s where FATs (file allocation tables) come in.
Today’s operating systems make file storage and retrieval virtually transparent to the user, but the steps Windows must take to find the information you request are extremely complicated. When a link to a file or program is clicked, Windows must quickly find
the associated data in a sea of other files, load it, and then find some place to stow the file when it is edited. None of this would be possible without an advanced organizational structure, and that’s where FATs (file allocation tables) come in.The file systems organize data on hard drives, and FATs are the file systems of choice for Windows 95/98 and Windows Me. FATs, as the name implies, are tables used for organizing and labeling data on a hard drive. Think of them as vast spreadsheets containing the location of every file on the hard drive, along with information regarding the type of file it is and any special attributes the system or user has assigned to each file. They also keep track of the empty portions of the hard drive, so Windows will know where to store new or modified files.
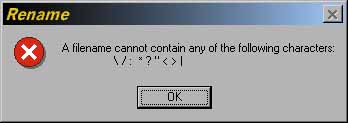
The FAT also establishes the names, characters, and extensions that are reserved for system use only and are not selectable by the user. FAT file names can’t contain certain characters (“ / \ [ ] : ; | ,=) or have the names AUX, COM1, COM2, COM3, COM4, CON, LPT1, LPT2, LPT3, NUL, or PRN. Many attributes are assignable to files on a hard drive, and the file system determines which are possible. Files within a FAT structure can be marked as hidden, read-only, archives, or system files, and the operating system will know to treat them accordingly. Files marked hidden, for example, do not show up in a Win98 folder unless the user actively forces files with the hidden attribute to become visible. Read-only files cannot be deleted or modified until that attribute is cancelled.
Partitions are extremely useful; FAT technology is far more efficient when used with small drives rather than with large drives, and this fact has everything to do with cluster sizes. Clusters are the basic building blocks used by FAT to store and label files. Each partition (or the entire hard drive if there are no other partitions) consists of thousands of tiny clusters, which are the smallest portion of a hard drive that the operating system can address. Cluster size depends entirely on the version of FAT the hard drive uses and the size of that disk or partition. FAT16 uses 8KB clusters on 256MB to 511MB hard drives, 16KB clusters on 512MB to 1,023MB (1GB) hard drives, and 32KB clusters when used with 1GB to 2GB hard drives. The maximum amount of hard drive space that the FAT16 file system can address on a single drive is 2GB, meaning the file format is basically worthless when used with today’s cavernous hard drives. Partitioning a larger drive into several 2MB chunks is possible, but as you’ll soon see it is far more efficient to format a large hard drive with FAT32 and forget about creating a lot of partitions. Bumping the file system up to 32-bits with FAT32 yields dramatic improvements. The technology addresses single drives of up to 2TB (terabytes), providing plenty of breathing room for the time being. Best of all, FAT32 allows for smaller minimum cluster sizes on larger hard drives. Although the technology is incompatible with hard drives smaller than 512MB, it boasts 4KB cluster sizes on drives from 512MB all the way up to 8GB. The cluster size jumps to 8KB on drives between 8GB and 16GB, to 16KB on 16GB to 32GB drives, and to 32KB on drives larger than 32GB. The benefit of smaller clusters is the more efficient use of hard drive space. Say, for example, you have a 2GB hard drive using FAT16. A cluster size of 32KB means that files smaller than 32KB still take up 32KB of space. A small, 4KB text file must be put in a single 32KB cluster, but no other data can be stored there or Windows wouldn’t be able to look it up. Because many files on a hard drive are smaller than 32KB, it’s easy to see how this wasted space adds up. Let’s look at that same 2GB drive using FAT32. With 4KB clusters, that 4KB file takes up an entire cluster, “reclaiming” the 28KB of space wasted in the 32KB cluster on the FAT16 drive. You can get a better idea of how this works by referring to the “How FAT Works” infographic at the end of this article. Of course, massive gains in storage capacities have yielded consumer hard drives far larger than 32GB, meaning FAT32 is becoming just as antiquated as FAT16 in terms of cluster sizes. On the bright side, saving a few dozen megabytes of storage space was much more important on the 1GB and smaller hard drives of five years ago than it is on the current, massive-sized drives. Losing even a few hundred megabytes on a 30GB or larger drive represents a negligible amount of waste. Remember, smaller clusters always equate to slightly more storage space on a hard drive due to their efficiency, but it comes at the expense of speed. Finding a specific cluster takes more time if there are more clusters to sift through, and the 2GB FAT16 drive used in the example in the “How FAT Works” infographic may actually be faster than the 2GB FAT32 drive if everything else is equal. In real-world terms, the performance differences are negligible, and the benefits of smaller clusters far outweigh any minor performance hits.
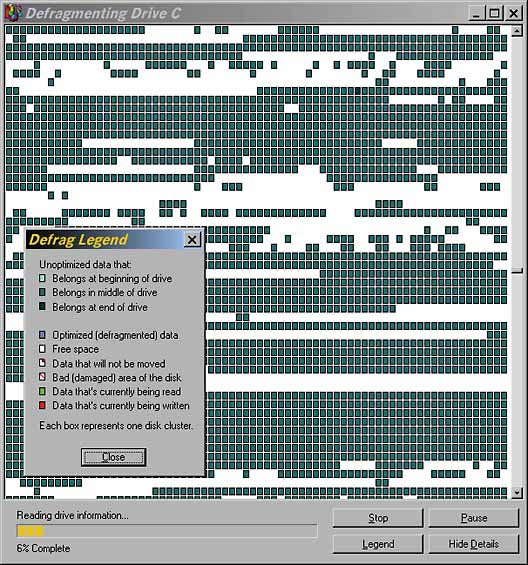
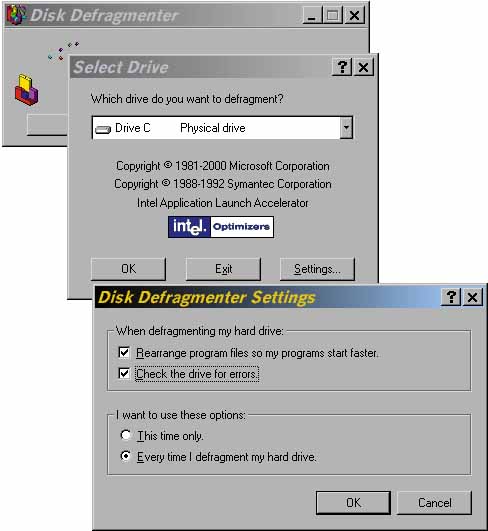
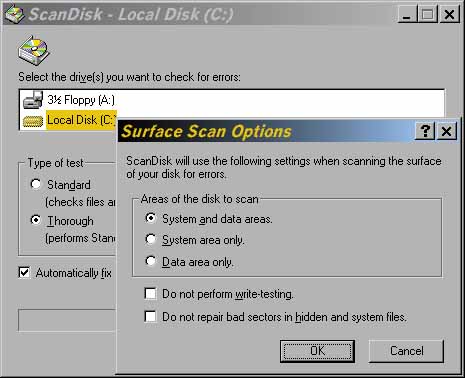
To keep a hard drive from becoming too fragmented and taking a performance hit, Microsoft includes the Disk Defragmenter utility in all versions of Win9x/Me. To access Disk Defragmenter, click Start, expand Programs, Accessories, System Tools, and click Disk Defragmenter. The utility takes a look at the hard drive, finds related clusters, and does its best to relocate those linked clusters so they’re closer together. The defragmentation algorithms have become more effective over the years, and Win98 came with Intel’s Application Launch Accelerator technology. This technology keeps track of the programs you use most and tries to put all of the files used to open those programs in close proximity on the hard drive. As a result, programs launch faster because the hard drive read heads have to travel less physical distance to access them all. Once you launch Disk Defragmenter, you’ll see several options. Select the drive to defragment from the drop-down menu and click the Settings button. If the option is available, check the Rearrange Program Files So My Programs Start Faster box to take advantage of the Application Launch Accelerator. Do not check the Check This Drive For Errors box unless you are prepared to add a lot of time, perhaps hours, to the defragmentation process. Click OK twice to start the procedure. If you click the Show Details button you can see a visual representation of the data clusters currently on your hard drive, and you can watch the utility shuffle them around and optimize things. Remember, it’s very important to shut down all of your programs before starting to run the Disk Defragmenter. You will not be able to do any work during the operation. If you’ve neglected to close a program, and you have to close it after Disk Defragmenter has begun running, the utility must stop and start over from scratch. And it has to do this each time you modify the hard drive’s contents in any way.
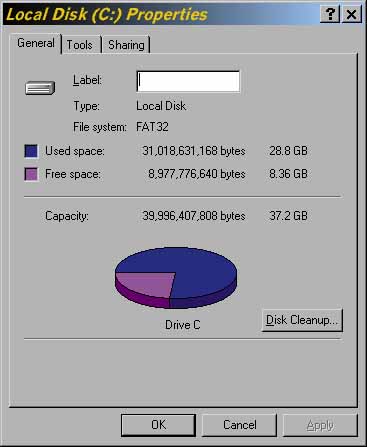
To see what version of FAT your system is using, open My Computer and right-click the icon for the drive you wish to check. Click Properties from the context menu, and select the General tab, and take a look at the File System entry. It will read either FAT (denoting FAT16) or FAT32. Making the jump to FAT32 is a completely automated process in all versions of Windows that support the file system. You can access the Drive Converter, which is the tool that makes the change, by clicking Start, Programs, Accessories, System Tools, and Drive Converter. There are a few things you’ll want to consider before making the leap. If you have an older computer with a 1GB or smaller hard drive, sticking with FAT16 is the best bet in terms of storage capacity and performance. Hard drives in older computers are slower than today’s hard drives, and filling them with more clusters than necessary can dramatically hamper system performance. Compatibility is another concern. Many older software utilities that were designed to work with FAT16 (or older iterations of FAT) will not work on a FAT32 drive, so check the Web sites of manufacturers of your major software to make sure you won’t have to make expensive software upgrades. If your hardware is very old (an original Pentium or of 486 vintage), contact the manufacturer to make sure the hardware itself is compatible with FAT32. Some older computers have problems with the technology. Finally, keep in mind that Drive Converter is a one-way street. It will convert the drive to FAT32 without disturbing all the files and programs you have stored there, but there is no easy way to go back to FAT16 if the newer technology does not agree with your system or meet your expectations. To return to FAT16, you will have to completely reformat your hard drive and begin with a clean slate amd then reinstall the operating system with the FAT16 option. After considering your options, you may decide that the benefits of converting your system to FAT32 outweigh any potential drawbacks. Save information in all of your open programs and be sure to close the programs before launching Drive Converter. You’ll want to follow the system prompts and pay close attention to any warnings the wizard provides regarding incompatible programs that are installed on your hard drive. If you have enough space, make a backup of your files when prompted to do so. When that’s finished, sit back and let Drive Converter go through its routine. You’ll need to budget 30 to 60 minutes or more to complete the procedure, barring any mishaps.
by Tracy Baker View the graphics that accompany this article. (NOTE: These pages are PDF (Portable Document Format) files. You will need Adobe Acrobat Reader to view these pages. Download Adobe Acrobat Reader)
|